22 February, 2023
Dry Bean Guide
One of the easiest thing to start your canning journey is dry beans. Beans are perfect for a variety of recipes, as well as being high in protein and are extremely versatile. The best thing about canning beans is there’s no soaking, there’s no waiting to use, they’re ready and waiting on your shelf when you need them, no 18 hour wait needed. Other than rinsing beans, there’s no real prep work needed, just measure and add to jars along with your preferred liquid.
When canning beans it can be quite handy to think ahead of how you’ll use them, in order to add the right broth (if desired) or seasonings. I like to can my beans with smoked ham hock broth, it gives my beans a wonderful flavor that can add an amazing taste to almost any recipe. Ham hock broth is rather simple, 1 smoked ham hock and about 6 quarts of water, allow to simmer on a low heat for 4-6 hours. If you have a pressure cooker, you can cut that time. Once my broth is done, I allow it to cool, then strain to remove bones and then cover and place in the fridge, usually over night to allow it to cool completely and begin canning with it the next day.
Measuring how many jars you’ll need is easy to guestimate once you get the hang of it, 1 pound of beans (16 ounces) is nearly 2 cups, if your recipe calls for 1/2 cup of beans you’ll get about 4 pints per pound.
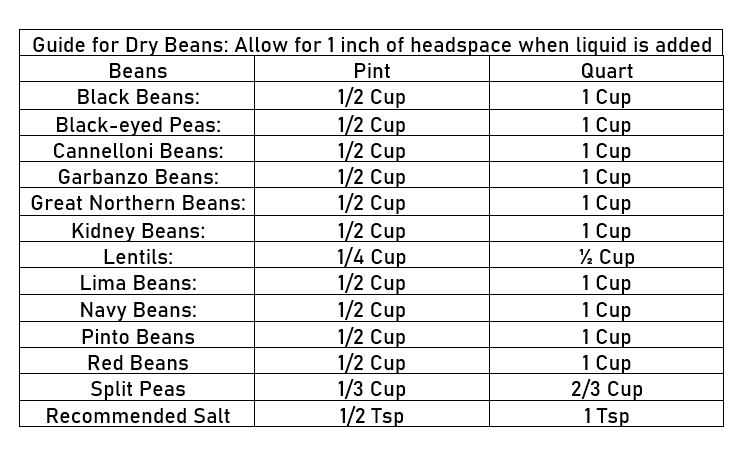
For the purposes of this guide I’m going to use Black Beans as an example. Starting with cold jars, cold broth, cold beans and a cold canner, I add the appropriate amount of beans for my jar size, I made pints. Using a jar funnel I add either my water, or broth till there is 1 inch of head space at the top of the jar. Using vinegar, or water if you prefer, wipe the rims of your jars, add your lids and rings, finger tighten.
Once all your jars are ready, add the appropriate amount of water to your pressure canner. I do not water bath beans, only pressure can. Place your jars in the canner and process according to your canners directions. Beans need to process for the same amount of time as meats. 75 Minutes for Pints, 90 Minutes for Quarts. Your time starts after the appropriate pressure has been reached after venting. Once finished, remove from heat, and allow the pressure to release on its own slowly.
Beans are an excellent way to build confidence in canning because they can be so simple and take very little time to prepare and complete. Once you get the hang of canning beans it’s easy to begin experimenting and making them in many different ways, or branching out and making soups or adding other ingredients with the beans.
Black Beans
Equipment
- Pressure Canner
- Dry Beans
- Canning Jars
- Canning Lids
- Broth or Water
Ingredients
- 1/2 Cup Black Beans
- 10 ounces Water or Broth
Instructions
- With prepared jars, add 1/2 cup black beans to pint jars, or 1 cup for quart jars
- Add liquid to fill the remainder of the jar, to 1 inch of headspace at the top of the jar. Pint jars need roughly 10 ounces of liquid after beans are added.
- Wipe rims of each jar, I prefer vinegar to ensure they're clean.
- Add lids to jars and tighten rings to finger tight.
- Place appropriate amount of cold water in your canner, add jars.
- Place lid on canner and process according to your manufacturers instructions. 75 Minutes for pint jars, 90 minutes for quart jars.